 Recent technology has made printing high-quality digital photos from your home computer a simple, inexpensive process. Using a basic inkjet printer and the following tips, you can easily transform your amateur shots into professional-looking photo albums, wall art or gifts for your loved ones.
Photo Resolution
Higher resolutions photos will produce better prints. However, resolution cannot be increased once the photo is snapped, so set your camera to the highest resolution possible. You can always reduce the size later. If you plan to print a photo that is less than 5x7 inches, 3 megapixels is sufficient. Larger photos require at least 5 megapixels.
Photo Editing
It is rare to capture a perfect image, so you may need to engage the services of photo editing software to enhance the photo quality. Free programs, such as Windows Live Photo Gallery for Windows 7 or Windows Photo Gallery for Windows Vista, allow you to apply a multitude of effects, including removing red eyes, balancing light and color, softening edges, rotating image orientation and cropping out unwanted elements.
Printer Settings
If you will be regularly printing photos at home, it is crucial that you purchase a quality machine capable of producing high dots per inch (dpi). Look for a printer that offers at least 600 dpi to produce vivid, crisp, finely detailed photos. These settings can be adjusted using your desktop computer or on the printer if it is equipped with a menu screen. High dpi settings will increase the amount of ink used and the time it takes to print the photo, so use the lowest quality settings to run a test print, then switch to the highest quality options when you are ready to run your final print.
Photo Quality Paper
Bright white glossy paper produces a vibrant, shiny image that reflects light well. Purchase paper that has a quick-dry surface and is water resistant to avoid bleeding issues. Matte paper is best for black-and-white or sepia colored prints due to its nonreflective coating. It is also less likely to become smudged from fingerprints and dust. Satin paper offers the best of glossy and matte prints, providing a semi-gloss finish that is still rich in color, yet reflects less light and is fingerprint resistant.
Printer Maintenance
Before printing, run the machine's print cartridge cleaning settings to remove any blockages that may have built up in the ink spray nozzles. You should also be able to adjust the machine's alignment and color calibration.
Windows 7 comes with some very attractive new wallpapers, and it's not always easy to decide which one you like the best. So why not choose a few, and let Windows display them all in a desktop slideshow?
Right-click an empty part of the desktop, select Personalize > Desktop Background, then hold down Ctrl as you click on the images you like. Choose how often you'd like the images to be changed (anything from daily to once every 10 seconds), select Shuffle if you'd like the backgrounds to appear in a random order, then click Save Changes and enjoy the show.
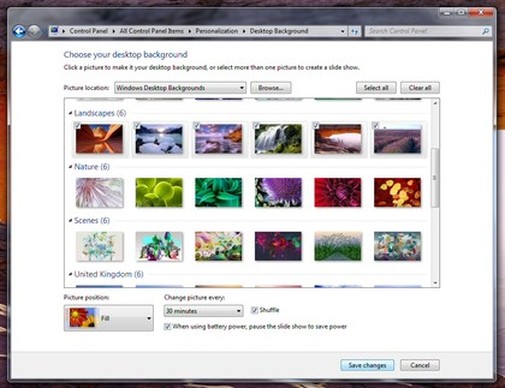 DESKTOP SLIDESHOW: Select multiple background images and Windows will cycle through them
Windows 7 has some spectacular new themes - there's a great selection at the Microsoft site - but installing them can have one annoying side-effect. If you've previously changed a system icon like Computer or the Recycle Bin then that could disappear, replaced by the equivalent icon from the theme pack. To prevent this, right-click an empty part of the desktop, select Personalize > Change Desktop Icons, clear the "Allow themes to change desktop icons" box and click OK. Your icons will now be preserved, and the only way to change them will be manually, from the same Desktop Icons dialogue.
Before you panic, accept the possibility that whatever is frustrating you is a Mac OS X difference, not a Mac OS X problem. Plenty of "problems" turn out simply to be quirks of the way Mac OS X works. For example:
My System Preferences controls are dimmed
Many of Mac OS X's control panels are off-limits to Standard account holders. Even if you're an Administrator, in fact, Tiger requires you to unlock System Preferences the first time you open it (by clicking on the padlock icon at the lower left corner of System Preferences and then entering your password).
I can't log in! I'm in an endless login loop!
If the standard Login screen never seems to appear - and you go straight to someone else's account every - it's because someone has turned on the automatic login feature...
You won't have a chance to sign in with your own account until somebody Logs Out. (Apple Menu - Log Out)
I can't move or open a folder.
Like it or not, Mac OS X is unix, and Unix has a very strict sense of who, among the people who share a Mac over time, owns certain files and folders. For starters, people who don't have Administrator accounts aren't allowed to move, or even open, certain important folders.
So how do we fix that?
First Resort: Repair Permissions
An amazing number of mysterious glitches arise because the permissions of either that item or something in your System folder have become muddled—that is, the complex mesh of interconnected Unix permissions.
When something just doesn't seem to be working right, open your Applications>Utilities folder and open Disk Utility. Once there, go to First Aid and click on Repair Permissions.
TIP: Many Mac mavens, in fact, believe in running this Repair Permissions routine after running any kind of installer, just to prevent any problems that might have lurked in. That includes both installers of new programs and of Apple's own Mac OS X updates.
Second Resort: Look for an Update If a program starts acting up immediately after you've installed or upgraded to Mac OS X 10.4, chances are good that it has some minor incompatibility. Chances are also good that you'll find an updated version on the company's Web site.
 If you use iCal to set up reminders and events it is often useful to add an alarm. This way you know an event is coming up and you will not forget it.
This post is about automatically setting up an iCal alarm for your events. This way you don’t have to manually add an alarm. Its rather simple to implement and can save you a couple of seconds when adding a new event.
To add a default alarm, go to iCal > Preferences >General from the menu bar. This will load the preferences for iCal. Within the options take a look about half way down for an option that says “Add a default alarm”. Check the box and add a time in the text box. The alarms are set in minutes, so if you want an alarm set for the day before enter 1440 minutes.
Now every time you add a new event within iCal it will automatically add an alarm to that event.
If an application locks up under a previous version of Windows then there was nothing you could do about it. A new Windows 7 option, however, can not only explain the problem, but may get your program working again without any loss of data.
When the lockup occurs, click Start, type RESMON and click the RESMON.EXE link to launch the Resource Monitor.
Find your frozen process in the CPU pane (it should be highlighted in red), right-click it and select Analyze Wait Chain.
If you see at least two processes in the list, then the lowest, at the end of the tree, is the one holding up your program. If it's not a vital Windows component, or anything else critical, then save any work in other open applications, check the box next to this process, click End Process, and your locked-up program will often spring back to life.
At first glance the Windows 7 calculator looks just like Vista's version, but explore the Mode menu and you'll see powerful new Statistics and Programmer views. And if you're clueless about bitwise manipulation, then try the Options menu instead. This offers many different unit conversions (length, weight, volume and more), date calculations (how many days between two dates?), and spreadsheet-type templates to help you calculate vehicle mileage, mortgage rates and more.
Don't take any Windows 7 applet at face value, then - there are some very powerful new features hidden in the background. Be sure to explore every option in all Windows applets to ensure you don't miss anything important.
Defragmentation helps speed up access to data on your drive. In this section, you’ll learn how to schedule defragmentation so you don’t have to worry about ensuring your drive is defragmented.
Windows XP, Vista, and 7 all come with a built-in disk defragmenting tool. I’ll show you how to use this and set up a schedule.
Setting up scheduled defrags is easy:
1. Click the Start button, type defrag, and click Disk Defragmenter.
2. Click Configure schedule.
Choose a time when your computer is turned on, but you are not using it.
4. Click OK and Close to save your settings
Your disk will now be defragmented regularly.
In Office 2010, the navigation pane replaced the old Find window. And Outlook has as well received an updated search function, and an even more detailed one at that.  You can begin searching by typing into the text box located over your email previews. As expected, typing in a word or phrase will narrow down the list of results to those that include what you’re looking for. The real magic is found in Tab that now appears in the Ribbon interface.
Using the Search tab you can narrow down your search. You can search only emails from a specific contact, only the subject line, only emails with attachments, only emails sent within a certain time frame, only emails that are unread, only emails that are categorized, and more. You can also open recent searches!
Give it a go!
 Here are some tips to ensure malware is not given access to your computer: - Keep your computer up to date.
- Keep your browser up to date.
- Install a good antimalware program (Like Microsoft's own Security Essentials)
- Download free software only from sites you know and trust.
- Avoid clicking links inside pop-up windows.
- If you are offered antimalware programs while browsing, don’t install them.
Following these rules, you’ll protect yourself and decrease the chances of getting malware on your system.
|


 RSS Feed