Due to Hurricane Irene hitting our area, Rupert-Tech will remain closed from Saturday 8/27 through Monday 8/29.
Normal business operations will resume on Tuesday 8/28 or as soon as it is allowed by the authorities.
At this time we would like to thank you all for the support and hope everyone will remain safe throughout the weekend.
Please be safe.
*For those interested, we will be streaming live footage of Hurricane Irene from Flushing, NY. Please follow the link below to access the live streaming.
http://www.ustream.tv/channel/weather-track
 The most basic step you can take to prevent power loss on your mobile PC is to invest in a high quality battery and always keep a spare on hand. Splurging on a quality battery and spare can save you from hours of lost access to your mobile PC. Battery Care Once you've invested in a good battery, you need to take care of it. To clean your battery contacts, first turn off and unplug your mobile PC. Remove the battery and wipe its metal contacts and its contacts inside the device with a cotton swab dipped in rubbing alcohol. Let dry completely before reinstalling and reconnecting to a power source. Repeat every two to three months. Modern lithium ion batteries can be recharged and partially discharged time and time again, but you should never fully discharge them. Nickel-metal hydride (NiMH) batteries common to older laptops should be completely drained and recharged every one to three months. After mastering the basics of battery care, make sure you are utilizing your mobile PC's built in energy saving features. Optimize Your Power Settings The hard disk and display on your mobile PC consume the most battery power. Choose a power plan, referred to as a power scheme in Windows XP, to reduce the use of power-hungry functions and lessen screen brightness. Utilize the following battery-saving states: - Sleep or Standby
In a sleep state, your hard disk and display turn off, and all open programs and files are saved in Random Access Memory. In case of a crash or power loss, save your work before placing your system in sleep mode. Your mobile PC should wake up quickly from sleep, and your desktop and files should appear just as you left them.
- Hibernation
When your computer hibernates, it saves everything to its hard disk before shutting down. When you restart, your desktop should be restored exactly as you left it. Hibernation takes a bit longer to wake up from than sleep, but it uses less power.
Further Tips for Lowering Your Energy Use: - Turn off your wireless device when you're not connected to a wireless network but you're using your mobile PC.
- Turn off scheduled tasks.
- Keep the use of tools in the notification bar minimal.
- Limit power-intensive activities such as gaming, watching a DVD or listening to a CD.
- Reduce power consumption by adding memory (RAM) to your mobile PC.
 Recent technology has made printing high-quality digital photos from your home computer a simple, inexpensive process. Using a basic inkjet printer and the following tips, you can easily transform your amateur shots into professional-looking photo albums, wall art or gifts for your loved ones.
Photo Resolution
Higher resolutions photos will produce better prints. However, resolution cannot be increased once the photo is snapped, so set your camera to the highest resolution possible. You can always reduce the size later. If you plan to print a photo that is less than 5x7 inches, 3 megapixels is sufficient. Larger photos require at least 5 megapixels.
Photo Editing
It is rare to capture a perfect image, so you may need to engage the services of photo editing software to enhance the photo quality. Free programs, such as Windows Live Photo Gallery for Windows 7 or Windows Photo Gallery for Windows Vista, allow you to apply a multitude of effects, including removing red eyes, balancing light and color, softening edges, rotating image orientation and cropping out unwanted elements.
Printer Settings
If you will be regularly printing photos at home, it is crucial that you purchase a quality machine capable of producing high dots per inch (dpi). Look for a printer that offers at least 600 dpi to produce vivid, crisp, finely detailed photos. These settings can be adjusted using your desktop computer or on the printer if it is equipped with a menu screen. High dpi settings will increase the amount of ink used and the time it takes to print the photo, so use the lowest quality settings to run a test print, then switch to the highest quality options when you are ready to run your final print.
Photo Quality Paper
Bright white glossy paper produces a vibrant, shiny image that reflects light well. Purchase paper that has a quick-dry surface and is water resistant to avoid bleeding issues. Matte paper is best for black-and-white or sepia colored prints due to its nonreflective coating. It is also less likely to become smudged from fingerprints and dust. Satin paper offers the best of glossy and matte prints, providing a semi-gloss finish that is still rich in color, yet reflects less light and is fingerprint resistant.
Printer Maintenance
Before printing, run the machine's print cartridge cleaning settings to remove any blockages that may have built up in the ink spray nozzles. You should also be able to adjust the machine's alignment and color calibration.
Windows 7 comes with some very attractive new wallpapers, and it's not always easy to decide which one you like the best. So why not choose a few, and let Windows display them all in a desktop slideshow?
Right-click an empty part of the desktop, select Personalize > Desktop Background, then hold down Ctrl as you click on the images you like. Choose how often you'd like the images to be changed (anything from daily to once every 10 seconds), select Shuffle if you'd like the backgrounds to appear in a random order, then click Save Changes and enjoy the show.
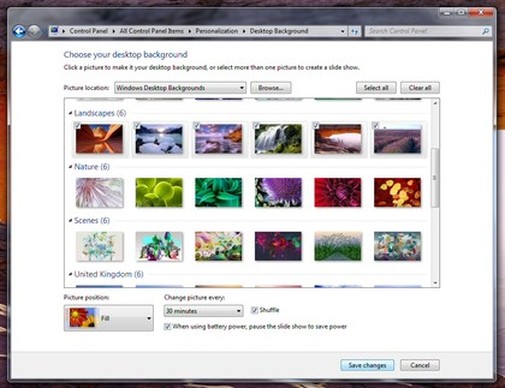 DESKTOP SLIDESHOW: Select multiple background images and Windows will cycle through them
Windows 7 has some spectacular new themes - there's a great selection at the Microsoft site - but installing them can have one annoying side-effect. If you've previously changed a system icon like Computer or the Recycle Bin then that could disappear, replaced by the equivalent icon from the theme pack. To prevent this, right-click an empty part of the desktop, select Personalize > Change Desktop Icons, clear the "Allow themes to change desktop icons" box and click OK. Your icons will now be preserved, and the only way to change them will be manually, from the same Desktop Icons dialogue.
Fix smeary printouts
If you use an inkjet printer and see smearing on a page, it's typically because something is sticking to the printhead. If your printer includes the nozzles in the cartridges—as most HP printers do, for example—and you see smearing immediately after changing a cartridge, remove the cartridge and check to make sure the protective tape over the nozzles is completely removed. If some of the tape is still attached, remove it, being careful not to touch the nozzle plate.
Print in the right order
Most laser printers print pages so they come out face down. For a multipage document, this puts the pages in the right order when you turn over the stack. Most inkjets print pages face up, which will normally put the first page on the bottom of the stack, so you have to reorder the pages. A few inkjets default to reversing the print order, so the last page prints first and the first page prints last, and everything's in the right order. Many don't have that feature, however.
For those inkjets that don't have a reverse print feature in the driver, some programs offer printing in reverse order. In Word 2003, for example, you can choose Tools |Options, then the Print tab, and add a check to the Reverse Print Order check box. In Word 2007, you can choose the Microsoft Office Button, click Word Options, and pick the Advanced options in the pane on the left-hand side of the dialog box. Then scroll down to the print options, and check the Print Pages In Reverse Order box.
An alternative approach for Word is to tell the program to print the range in reverse order. To print a 24 page file in Word 2003, for example, instead of searching for the Reverse Print Order option, you can just choose File | Print, and, in the Pages text box, tell Word to print pages 24-1.
This alternative approach may also work for some programs that lack a reverse-print option but offer the option to print a range of pages. Don't try using both approaches at the same time, however, or use either with a driver that also reverses the order. Just as two negatives equal a positive, two commands to reverse order will cancel each other out.
Before you panic, accept the possibility that whatever is frustrating you is a Mac OS X difference, not a Mac OS X problem. Plenty of "problems" turn out simply to be quirks of the way Mac OS X works. For example:
My System Preferences controls are dimmed
Many of Mac OS X's control panels are off-limits to Standard account holders. Even if you're an Administrator, in fact, Tiger requires you to unlock System Preferences the first time you open it (by clicking on the padlock icon at the lower left corner of System Preferences and then entering your password).
I can't log in! I'm in an endless login loop!
If the standard Login screen never seems to appear - and you go straight to someone else's account every - it's because someone has turned on the automatic login feature...
You won't have a chance to sign in with your own account until somebody Logs Out. (Apple Menu - Log Out)
I can't move or open a folder.
Like it or not, Mac OS X is unix, and Unix has a very strict sense of who, among the people who share a Mac over time, owns certain files and folders. For starters, people who don't have Administrator accounts aren't allowed to move, or even open, certain important folders.
So how do we fix that?
First Resort: Repair Permissions
An amazing number of mysterious glitches arise because the permissions of either that item or something in your System folder have become muddled—that is, the complex mesh of interconnected Unix permissions.
When something just doesn't seem to be working right, open your Applications>Utilities folder and open Disk Utility. Once there, go to First Aid and click on Repair Permissions.
TIP: Many Mac mavens, in fact, believe in running this Repair Permissions routine after running any kind of installer, just to prevent any problems that might have lurked in. That includes both installers of new programs and of Apple's own Mac OS X updates.
Second Resort: Look for an Update If a program starts acting up immediately after you've installed or upgraded to Mac OS X 10.4, chances are good that it has some minor incompatibility. Chances are also good that you'll find an updated version on the company's Web site.
|


 RSS Feed